
Midnight Blue wishes you peace, love, joy, health and prosperity in 2012!
Happy New Year!!
Midnight Blue wishes you peace, love, joy, health and prosperity in 2012!
Happy New Year!!
I usually like to take holiday photos and post them, but I wanted to let you know why there are none thus far this year … but … my heart is full of the holiday spirit and that I send your way as you prepare to share this time of year with those you love.
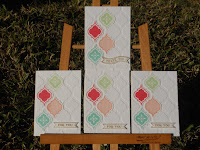
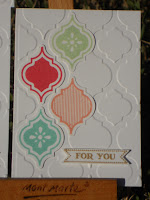
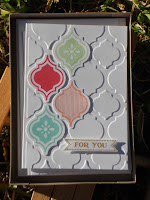
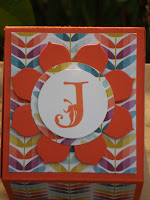
A few weeks back I had a workshop hosted by my Bestie. We had only a diligent few, but man-o-man did we have some fun!!! She requested that we use the All Dressed Up Framelits….so no problem there. I love these things. I also wanted to include a couple of new items from the brand new catalogue, So this is what I came up with……
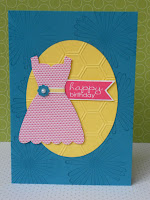
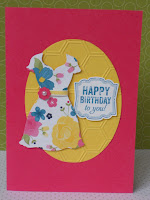
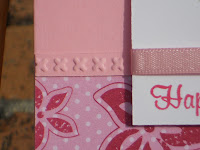
Now before you all fall off your chairs….yes….I KNOW there is a HUGE use of PINK in these projects. It was forced upon me by the DSP I used, which is the very pretty Gingham Garden. It also had a flower from Mixed Bunch stamped in Versamark to fill in the blank background. Now the OCD side of me also meant that each attendee had a different strip of DSP and therefore different coloured main CS, inks etc. I also used the Label Love and Banner Greetings stamp sets and the co-ordinating punch with Label Love – Artisan Punch. As you can imagine, with framelits, embossing, bling and dimensionals it was creative chaos!!!
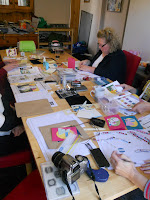
Sadly I did not get pics of the ladies’ creations (bad demo!!) I did however make my hostess a unique thank you gift, a box of notecards and co-ordinated box in the new 2013-15 In Colours!!
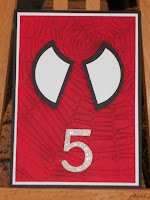
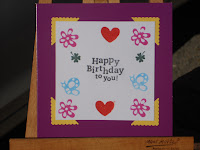
A quick post for you all today. I had to do a card for a Master turning 5 on the hop (so to speak) and I was left scratching my head as to what would go up very quickly. As if to answer my prayers, his mother poster a picture of him on Facebook celebrating his 5th birthday all dressed up as a superhero. LIGHTBULB!!!!!!!
I recalled a card I had seen by France Martin here. So I put my creative mind to task and this is what I came up with…..


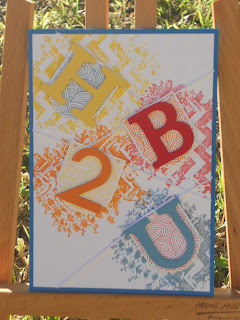
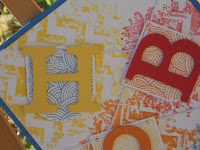
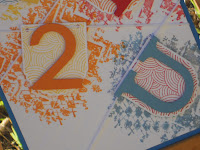
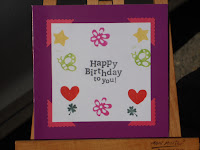
Recently I had to make a card for Bestie’s little boy who was turning 8. As usual, I left it to pretty much the last minute. I had hoped to do a punch art creation, but instead, I caught a glimpse of a card on someone’s Pintrest board and I went form there.
The card I based mine on I found here (2nd card down) but as you can see it was a very girly card and I needed a real BOY card. I really liked the idea of the HB2U…especially for a boy. With that in mind, I created this……

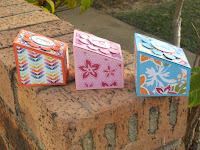
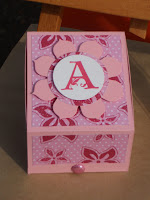
For regular readers of my blog, you know I LOVE a good box and co-ordinated gift. Recently whilst blurfing (blog surfing) I stumbled across Sam from Pootles Papercraft in the UK. She make ALL kinds of boxes and gifts and even does DO’s for the visual learners amongst us.
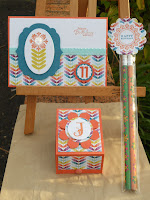
The original contact I had with Sam’s blog involved today’s project. Miss 9 had 3 friends (twins turning 11 and a bestie at school turning 10) that needed gifts. Sam’s box here was the perfect opportunity to give these gorjus boxes a whirl. Here is the finished projects…….
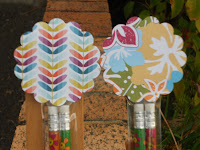
For the twins……… (remember to click on the photos if you wish to make them larger)
The card was inspired by this one.
Aren’t these boxes just delish???? The lids close on an angle as you can see here. Sam’s box did not cover the sides in DSP, but I really liked the look of this.

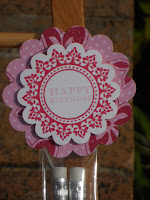
The pencils I found in the Reject Shop. Pack of 12 for $2….so bargain indeed. I popped them in a skinny cello bag and made a topper with the 2 3/8″ and 1 1/4″ Scallop Circle Punches and you get this….(the stamp set I used is an old retired SAB set).
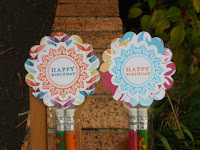
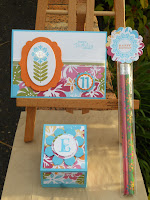
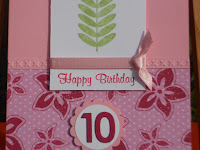
Now for Miss Turning 10….well it was the same idea, but just a different colour combination…..and it HAD to be PINK!!! (insert exasperated pink-ugh sigh!!)
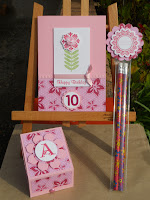
The card was inspired by LeeAnn Greff. It was in her January Newsletter, but I cannot find a pic of it to share with you. The thing I loved about it was the seamless transition between the embossed CS and the ribbon. She (I think) must have used the simply scored, but I used the “x” emboss of the Needlepoint EF’s.
Thanks for popping by. If you are in Sydney, I hope you are high and dry. The rain has been INSANE…..seriously…I think we are near 10 days straight now. I can’t recall seeing rain this heavy and persistent for a long time.
Addit…..
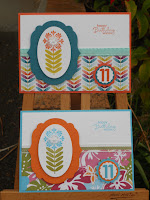
Oops…I am such a bad Mumma!!! Miss 9 received some card making stamps and supplies for her birthday (early June) and was very keen to make the twins a card each. I helped with the corner decorations….it is the Postage Stamp punch cut on the diagonal. Worked a treat!!! This is what she made……
Stuff used:
CS: (SU) Tangerine Tango, Tempting Turquoise, Island Indigo, Pretty in Pink (retiring soon…sniff), Rose Red, Whisper White, Sycamore Street DSP (SAB ’13) Island Oasis DSP (ret)
Ink: (SU) Tangerine Tango, Tempting Turquoise, Summer Starfruit, Old Olive, Pretty in Pink, Pear Pizzaz, Rose Red
Stamps: (SU) Madison Avenue (SAB ’13), Lovely Letters Alphabet, Petite Pairs, Amy R – Birthday Sentiments
Punches and Dies: (SU) Labels Collection Framelits, Fun Flowers Bigz L Die, Scallop Circles in 2 3/8″, 1 1/4″ and 7/8″, Circles in sizes 3/4″, 1″ and 1 1/4″, SU Needlepoint EF, Memory Box Numbers Die
Other bits: LOTS of dimensionals, Vintage Faceted Buttons, Double sided tape.
Lynda xx